
What is an Outlook?
How to Send Bulk Email From Outlook Using Excel with Attachment. Outlook is a free web-based e-mail service provided by Microsoft. It is similar to Google’s Gmail service. Outlook e-mail services are used by almost every organization in the world to communicate. In this article, we will learn to send bulk e-mails with attachments from Outlook by using VBA.
How Popular is Microsoft Outlook
As you know, Outlook is used by almost every business to communicate as it’s a very user-friendly e-mail service that helps users to send bulk e-mails, and documents. Also, the outlook is added an in-build in Microsoft packages. If we talk about Visual Basic Application, the outlook has added the services for a VBA Developer to build the script in the backend to automate the process.
What is an Outlook Automation Tool?
The tool is developed in Excel using VBA that helps the user to automate their manual work to send bulk e-mail, attachments, and other manual tasks. It also helps the user to get the received e-mail and attachments from the Outlook Inbox.
How to use an Outlook Automation Tool
In this article, we will learn step-wise step the functionality of this tool as shown below.
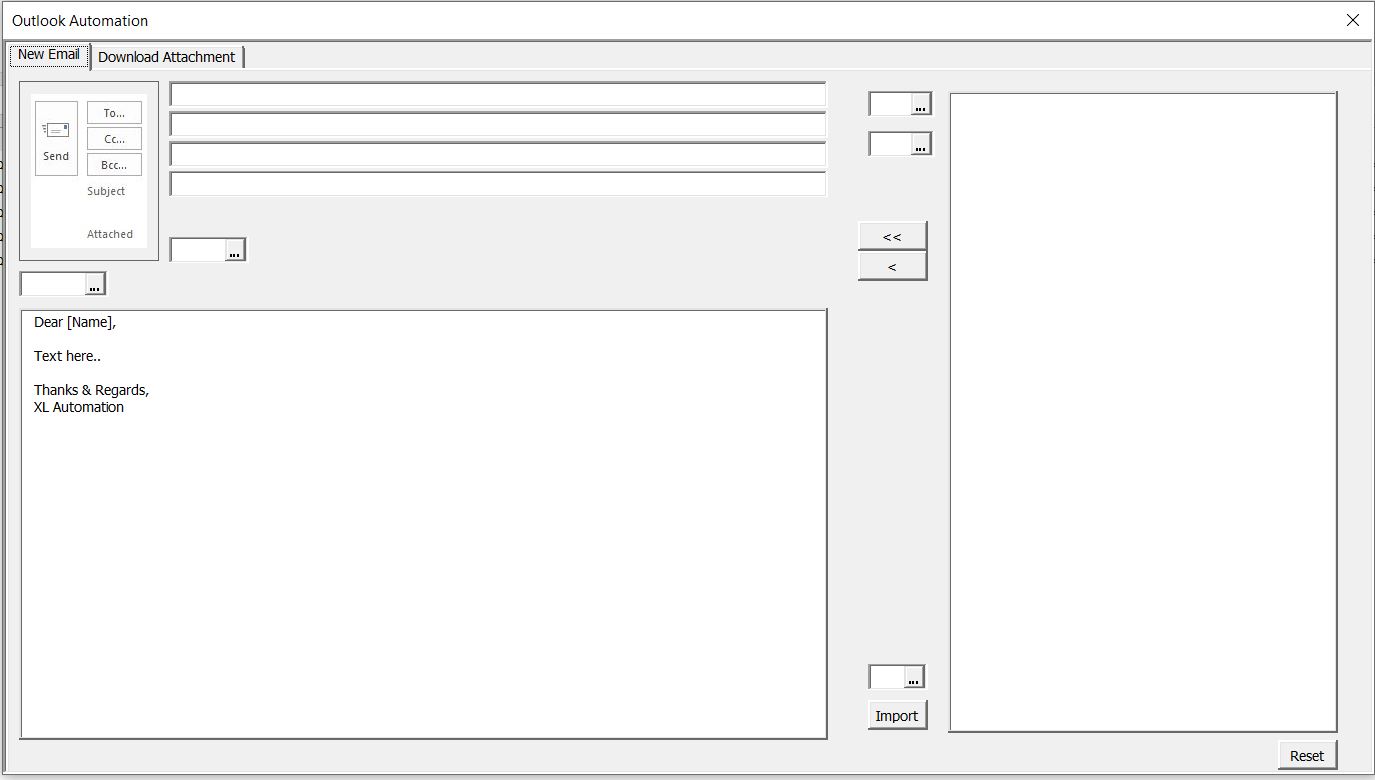
What is new Email tab?
In this tab, there is the following option as mentioned below:
1. TO: the option for the e-mail multiple or single receiver where you can input the e-mail address for the person who will receive the e-mail. You can add multiple e-mail addresses by comma-separated in the box.
Note: TO input field shouldn’t be blank while sending an e-mail
2. BCC: the option for the e-mail multiple or single receiver who will receive e-mail separately but the TO input field shouldn’t where you can input the e-mail address for the person who will receive the e-mail. You can add multiple e-mail addresses by comma-separated in the box.
Note: TO input field shouldn’t be blank while sending an e-mail with BCC
3. CC: the option for the e-mail multiple or single receiver who will receive e-mail separately where you can input the e-mail address for the person who will receive the e-mail. You can add multiple e-mail addresses by comma-separated in the box.
Note: TO input field shouldn’t be blank while sending an e-mail with CC
4. Subject: the option for the e-mail is the Subject line, where you can write a subject line that helps the receiver to understand what is the purpose of this e-mail.
Note: The subject input field shouldn’t be blank while sending an e-mail
5. Subject: the option for the e-mail Attachments where you can browse attachments and add them with the e-mail. Either you can attach a single attachment or multiple attachments.
Note: All types of attachments you can add to the attachment
6. Name Header Selection: the option for the e-mail sender name where you can add by First Name, Last Name, or Middle Name by selection drop down on the top of the e-mail body field.
Note: The name selection is dynamic that will check the name header which is available in the drop-down
7. Body Text Box: the option for the e-mail text where you can input the e-mail content
Note: Do not delete the sender name Dear [Name] on the top of the body text as it will change dynamically based on Name Header Selection.
8. Header Selection (Optional): the option for the e-mail where you need to select email header, or as per your database table header name for e-mail.
Note: The Header Selection option will only be for the e-mail address
9. Email sender type selection (Optional): the option for the e-mail selection (TO, CC, BCC) where you need to select email type to input the email to To, CC, BCC, or you can manually add the e-mail in the input box.
Note: Either you can input the e-mail into TO, BCC, and CC or do it manually
10. Multi Selection (Optional): the option for the e-mail selection (TO, CC, BCC) where you add multiple e-mails into To, BCC, and CC.
Note: Either you can input the e-mail into TO, BCC, and CC or do it manually
11. Single Selection (Optional): the option for the e-mail selection (TO, CC, BCC) where you add a single e-mail into To, BCC, and CC.
Note: Either you can input the e-mail into TO, BCC, and CC or do it manually
12. dbase: the option for the database selection from the existing database is available in the Excel sheet
13. From Other Source: the option for the database selection from the other data source which is available on your computer drive.
14. Import: the button for the data import from the existing file or other data source
15. Database Table: In the right side corner there is an input box where you can see the database which is imported by you from the existing database or other data source from your computer.
16. Reset: There is a reset button in the right side bottom corner that helps you to reset the existing database. If you want to clear existing data from the User Form then you need to click on the button.
17. Send: you can send the e-mail by clicking on the send button in the top left corner
Note: Before clicking on the button please make sure all the requirements are in the full field as mentioned above.
Conclusion
I hope you are able to understand the functionality of the outlook automation tool. If you have any questions on this so, please comment to me in the below box. I will be happy to answer your questions. Thank you!
You have made some really good points there. I checked on the net for more info about the issue and found most individuals will go
along with your views on this web site.